
Run equipment · 11 held items · one equipped slot
PokéSurvivor Held Items
A held item changes the current run, and you can equip only one at a time. Items appear in normal or locked chests and as boss drops. Finding another item is a choice between keeping your current effect and replacing it, not a second equipment slot. Compare all 11 effects below, then read the notes for the choices whose damage, recovery or movement tradeoffs matter to your active move group.
All held-item effects
All 11 held items compete for one equipment slot. Use the role filter to compare items addressing the same problem, or search for an item name or effect. Compare recovery, damage, cooldown and movement effects according to your run's needs. Select an item name to compare its benefits and tradeoffs.
| Held item | Role | Game effect | Main consideration |
|---|---|---|---|
| Leftovers | Recovery | You recover 1.5% of your HP per second. | Passive recovery occupies the same slot as damage or cooldown equipment. |
| Choice Band | Damage | +40% damage, but you can't switch moves. | Locks the existing active move group while equipped. |
| Quick Claw | Movement / cooldown | -20% cooldown on all your moves. | Shorter cast intervals do not produce the same output change for every behavior. |
| Focus Sash | Defense | A hit that would knock you out leaves you at 1 HP (every 60 s). | A lethal-hit rescue has a 60-second reactivation interval. |
| Shell Bell | Recovery | You heal from the damage you deal. | Recovery requires damage dealt and has a 4 HP/s healing cap. |
| Amulet Coin | Run rewards / experience | +50% PokéCoins at the end of the run. | The bonus is to end-of-run PokéCoins rather than direct combat stats. |
| Lucky Egg | Run rewards / experience | +30% experience. | More experience does not directly increase damage per hit. |
| Life Orb | Damage | +30% damage, but each attack costs a little HP. | Most attacks consume HP; orbit and trail moves avoid the drain. |
| Choice Scarf | Movement / cooldown | +35% speed. | Movement speed helps repositioning rather than directly shortening cooldowns. |
| Rocky Helmet | Defense | Foes that hit you in melee take damage. | Retaliation depends on foes hitting you in melee. |
| Assault Vest | Defense | +20% damage reduction. | Adds 0.2 to damage reduction; the combined player reduction is capped at 0.8. |
Choose by the problem your run needs to solve
Choose an item for the problem your run needs to solve: recovery, damage, cooldown, movement or rewards. Equipping that effect means giving up the item already in your single equipment slot.
Leftovers · Recovery
Leftovers supplies recovery without requiring damage dealt to an enemy. It adds regeneration equal to 1.5% of your maximum HP at the moment you equip it; replacing it removes that added recovery. At 100 maximum HP when equipped, that contribution is 1.5 HP per second. This makes it a useful comparison with Shell Bell when your attacks are not landing consistently.
Choice Band · Damage
Choice Band multiplies your attack modifier by 1.4 and locks your existing active move group while equipped. Check the selected group before equipping it: a separate inactive attack slot will not become a second automatic damage source. This is a conditional damage choice when you are ready to stay with the selected attacks, rather than a free bonus for a build that needs frequent switching.
Quick Claw · Movement / cooldown
Quick Claw multiplies the cooldown modifier by 0.8. With other modifiers unchanged, a 1-second ordinary cast interval becomes 0.8 seconds; a 0.5-second interval becomes 0.4 seconds. The ordinary combat loop also has a 0.05-second minimum interval. Orbit attacks use their own continuous handling, and turrets have a separate firing interval, so this item should not be labeled a universal 25% total-DPS increase.
Focus Sash · Defense
Focus Sash can turn a lethal hit into survival at 1 HP. After a rescue, you must wait 60 seconds before it can save you again; each rescue also grants brief invulnerability. It is not continuous regeneration: after a rescue, you still need to escape danger or find another source of healing. Compare that emergency protection with Assault Vest's ongoing reduction or Leftovers' recovery.
Shell Bell · Recovery
Shell Bell queues healing equal to 4% of damage dealt, with a maximum queued amount of 4 HP. You receive the queued recovery at up to 4 HP per second. Dealing 50 damage adds 2 HP to the pending recovery before the cap. It therefore rewards landed attacks, but an enormous damage event does not grant unlimited instant healing. A support-only active slot cannot be evaluated as though it were continuously dealing damage.
Amulet Coin · Run rewards / experience
Amulet Coin multiplies the coin modifier by 1.5 while equipped. You earn more PokéCoins at the end of the run, while giving up the slot that could provide damage reduction or healing. Replacing Amulet Coin removes its reward multiplier. When weighing a replacement, account for the lost reward modifier as well as the immediate combat effect you would gain; do not assume the bonus permanently attaches when you first pick it up.
Lucky Egg · Run rewards / experience
Lucky Egg multiplies the experience modifier by 1.3. Its benefit concerns experience gained, which can affect how quickly you reach later level-up choices; it is separate from the move's damage value. Compare it with Amulet Coin by objective: experience during the run and PokéCoins at its end are different rewards. Replacing Lucky Egg removes its multiplier instead of preserving it alongside the new item.
Life Orb · Damage
Life Orb multiplies the attack modifier by 1.3. Each cast costs the greater of 1 HP or 1% of your maximum HP, leaving at least 1 HP; orbit and trail moves avoid this drain. Faster casting can therefore mean more frequent HP costs for other behaviors. The drain itself cannot knock you out, but its low-HP result still leaves you vulnerable to enemy damage. Compare this recurring cost with Choice Band's switching restriction.
Choice Scarf · Movement / cooldown
Choice Scarf multiplies the movement-speed modifier by 1.35. You can still switch moves while wearing it; Choice Band carries that restriction instead. This is a positioning option when you need to move between danger zones or keep enemies on a useful attack path. It does not apply Quick Claw's cooldown modifier, so treat faster travel and faster casting as separate benefits.
Rocky Helmet · Defense
Rocky Helmet damages foes that hit you in melee. It triggers when an enemy hits you in melee, while Shell Bell heals when your own attacks deal damage. Use that contact requirement when comparing it with ranged positioning or a build trying to avoid all hits.
Assault Vest · Defense
Assault Vest adds 0.2 to the player's damage-reduction value. Your combined reduction, including the defense buff, is capped at 0.8. It is an ongoing mitigation choice rather than a lethal-hit rescue or a healing source. If the combined reduction is already near the cap, some of its nominal addition may not change the final reduction. Pure damage bypasses this reduction, so Assault Vest cannot protect you from every damage source.
One item in the current run, with a real replacement decision
You can find held items in normal chests, more often in locked chests, and as drops from regular or rift bosses. The legendary summons during Judgment do not drop equipment. A random item offer gives you another choice for the current run; it does not guarantee the item your build needs.
Equipping a replacement removes the old item's effect before adding the new one. Choice Band's attack multiplier, Quick Claw's cooldown multiplier and Leftovers' recorded regeneration are therefore undone when replaced. You cannot add their bonuses together by equipping them one after another. The effects last for the current run.
Compare the offered item against the one you are already wearing. If you are relying on Leftovers between enemy contacts, replacing it with Life Orb changes both sides of your HP balance: passive item recovery disappears and most casts begin costing HP. If you are relying on Choice Band, replacing it also removes the item restriction on switching groups. Read the change as a swap of whole effects.
Know when the next boss can offer equipment
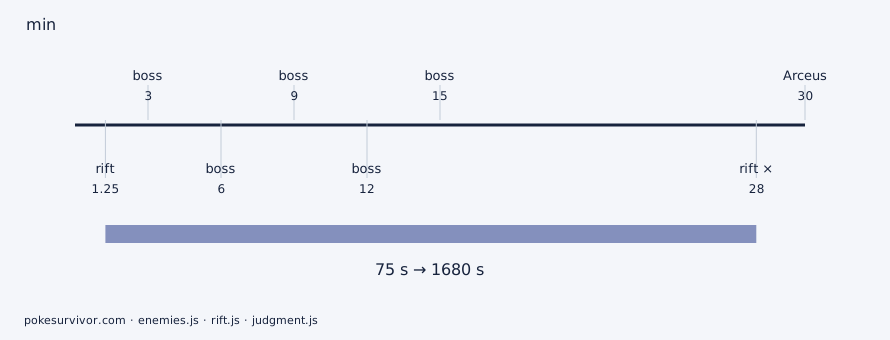
The five regular boss encounters start at 3, 6, 9, 12 and 15 minutes. Defeating one drops a random held item, so these checkpoints are opportunities to reconsider your equipped effect. Arceus's later Judgment summons do not drop items; rifts open through separate chance checks rather than scheduled equipment rewards.
A short decision process at the next item offer
First identify the failure you are trying to fix: running out of HP over time, being knocked out by a large hit, failing to reach a safe position, or spending too long between attacks. Leftovers and Shell Bell address recovery in different ways. Focus Sash addresses a lethal event, Assault Vest reduces ordinary incoming damage, and Choice Scarf changes movement speed. Their effects are not interchangeable just because all can help survival.
Next check the active attacks. Choice Band asks whether you can commit to the selected group. Quick Claw asks whether shorter cast intervals help the behavior you are using. Life Orb asks whether its extra damage justifies recurring HP costs for those casts. A move's five-level record distinguishes a turret's placement interval from its shot interval and an orbit from ordinary cast-based attacks.
Finally decide whether combat or progression is the immediate objective. Lucky Egg boosts experience; Amulet Coin boosts the end-of-run PokéCoin modifier. Either gives up the single slot that could provide a direct combat effect. Choose the effect that addresses your immediate goal, since gaining it means giving up your current equipment.